Saturday, September 15, 2012

smoooth as Buddah

Okay so I have a word limit here peeps, so pay close attention because I am not repeating myself: Doing the blog linky Ketchup With Us with Old Dog New Tits and According to Mags, prompt is about childhood crush in, 57 words.  That was 44 words.  Okay starting count in three ... two ... one ...

(to the tune of The Sign)

I, I had a huge crush
You could hardly blame me cuz he was so hot
How could you not love blond hair and blue eyes?
Yeah, he had a weird name
But those sexy Swedes us-u-ally do
Ooooo, is this clue enough? 


Ulf "Buddah" Ekberg was my childhood swoon. Hell, he's still pretty hawt.


So go link up and share who you were passionately in love with once-upon-a-time!

P.S. Sorry, the song is stuck in my head now too, and no I don't like it.

Scavenger Hunt -Potter Style

Okay I am nearly Harry Potter-ed out now, and I love the books.  So to my readers who aren't as devoted of fans (what's wrong with you? Just kidding, sorta) sorry.  Things have been a bit tedious here lately between the cake and the Hogwarts acceptance letter and those goshdamn owls.

Good news, this should be it for a while.  And it should be short.  I am only sharing because my kiddo loves scavenger hunts and puzzles and this process has gotten easier with time for me because I figured out a less obnoxious way of doing it.

In short, simple steps, because my brain is fried ...

Step One: What do you want the message to be?

This year I wanted it to be a sentence telling him where we were going out for dinner and present opening. I also, because he is older, wanted to give him as little help as possible.

The theme of my delivery, obviously, was Harry Potter and Meatball's supposed acceptance letter to Hogwarts.  So I typed up a letter in Dumbledore's handwriting font that explained he had to find his school supplies as listed in the letter.  Each supply would then have a clue.  Once he had them all he had to put them together and figure out the order.  This year I did not number them, in prior years I had.

The letter had 18 supplies, so I had 18 words to work with.  End result of the hunt would yield the sentence

"Tonight we are going to Streets of New York 
for Pizza and Presents to celebrate your eleventh birthday!" 

Step Two: Make your cards.

In Word I made a table, 2 x 18.  Sorry for the crappy pictures, I am full of them lately.


Once I had a table of the sentence in order, I made an exact copy of the table but put the Hogwarts supplies in the cells.  I made sure they were out of order, with the things I knew he'd find first being words like "to" and "for" so he wouldn't be able to figure it out.

Step Three: Pretty up the cards.  

I made my margins narrow and my cells 3.6 x 3.  Then I changed to the Dumbledore font and made sure my spacing worked.  I printed them on the same card stock as the Acceptance Letter and used the table lines to cut them out.  I have a paper cutter, so it was pretty fast, but scissors will work too.


One side had the supplies from the letter ...

... and the other side had a single word from 
the sentence telling him we'd be going to his favorite place to eat.

Step Four: Hide 'em!

This is the fun part.  I wanted him to be able to find them pretty independently, so I tried to find things similar to the actual supplies.  So all eight of the books on the list were in books -- the actual Harry Potter books One through Seven and the Tales of Beedle the Bard made eight.  The cauldron was in a pot in the kitchen, winter cloak was in a coat pocket, wand was with pencils (I made Meatball roll his eyes here because I had to say something about how writing and drawing are a magic of their own), etc.


Step Five: Sit back and enjoy. 

Meatball loves doing scavenger hunts.  To be honest we love watching him, not only because its fun to see him loving it but it also provides plenty of opportunities to mess with him too.


So that is all there is too it. Now I am taking a bit of a break from posting about my dear friend Harry.

Friday, September 14, 2012

Hogwarts Acceptance Letter

Being the teasey little hooker I am I left you hanging with this image on the tremendous finale of my cake saga.

While I can't bake or assemble cakes with a whole lot of freaking finesse, apparently, I can do other things.  I am a good painter and I am a geek when it comes to typography and text art.

For realz, I am working on getting an Etsy shop up so I can claim to be a productive member of society at times.  *nods earnestly*

Anyhoo, being that Meatball is turning eleven, is a total geek, and appreciates many of the same things that I appreciate I had this little mental convo with me the other day ...

Self One: Duuuuude, when Harry Potter turned 11 he got buried in Hogwarts acceptance letters via owl.

Self Two: Oooo, you are right, as always!

Self One: Aw, you're so sweet.

Self Two: So you think we should make one for the Meatball?

Self One: He'd love that! How hard could it be?

Self Two: Bitch, please, didn't you promise to never say that phrase again?  Remember the freaking cake?!

Yes, I speak to myself like that.  Its scary in this head, but sometimes very affirming.

Anyway, other than needing to promise Self Two that there would be no live owls or any feathers involved at all -- Self Two has a near OCD panic disorder type response to birds -- I got inspired.

Inspiration requires research.  Witnessing the mad skills of others can be freaking depressing, or just awesome.  When I searched Pintercrack and google for homemade Hogwarts letters I cam across total pieces of junk and then I saw this at *link removed per owner's request* ...

*Picture also removed per the owner's request*

And it took my geeky breath away.  Seriously, I was like needing a hit from my inhaler after seeing it.  There are options on Etsy where you can purchase, as there should be for something so purdy, but I wanted to try to make one of my own.   I lowered my standards and expectations a bit from some of the ones I found online, but gawked frequently at the images on the blog.  I also continued searching for other works of art, inspiration, and fonts.

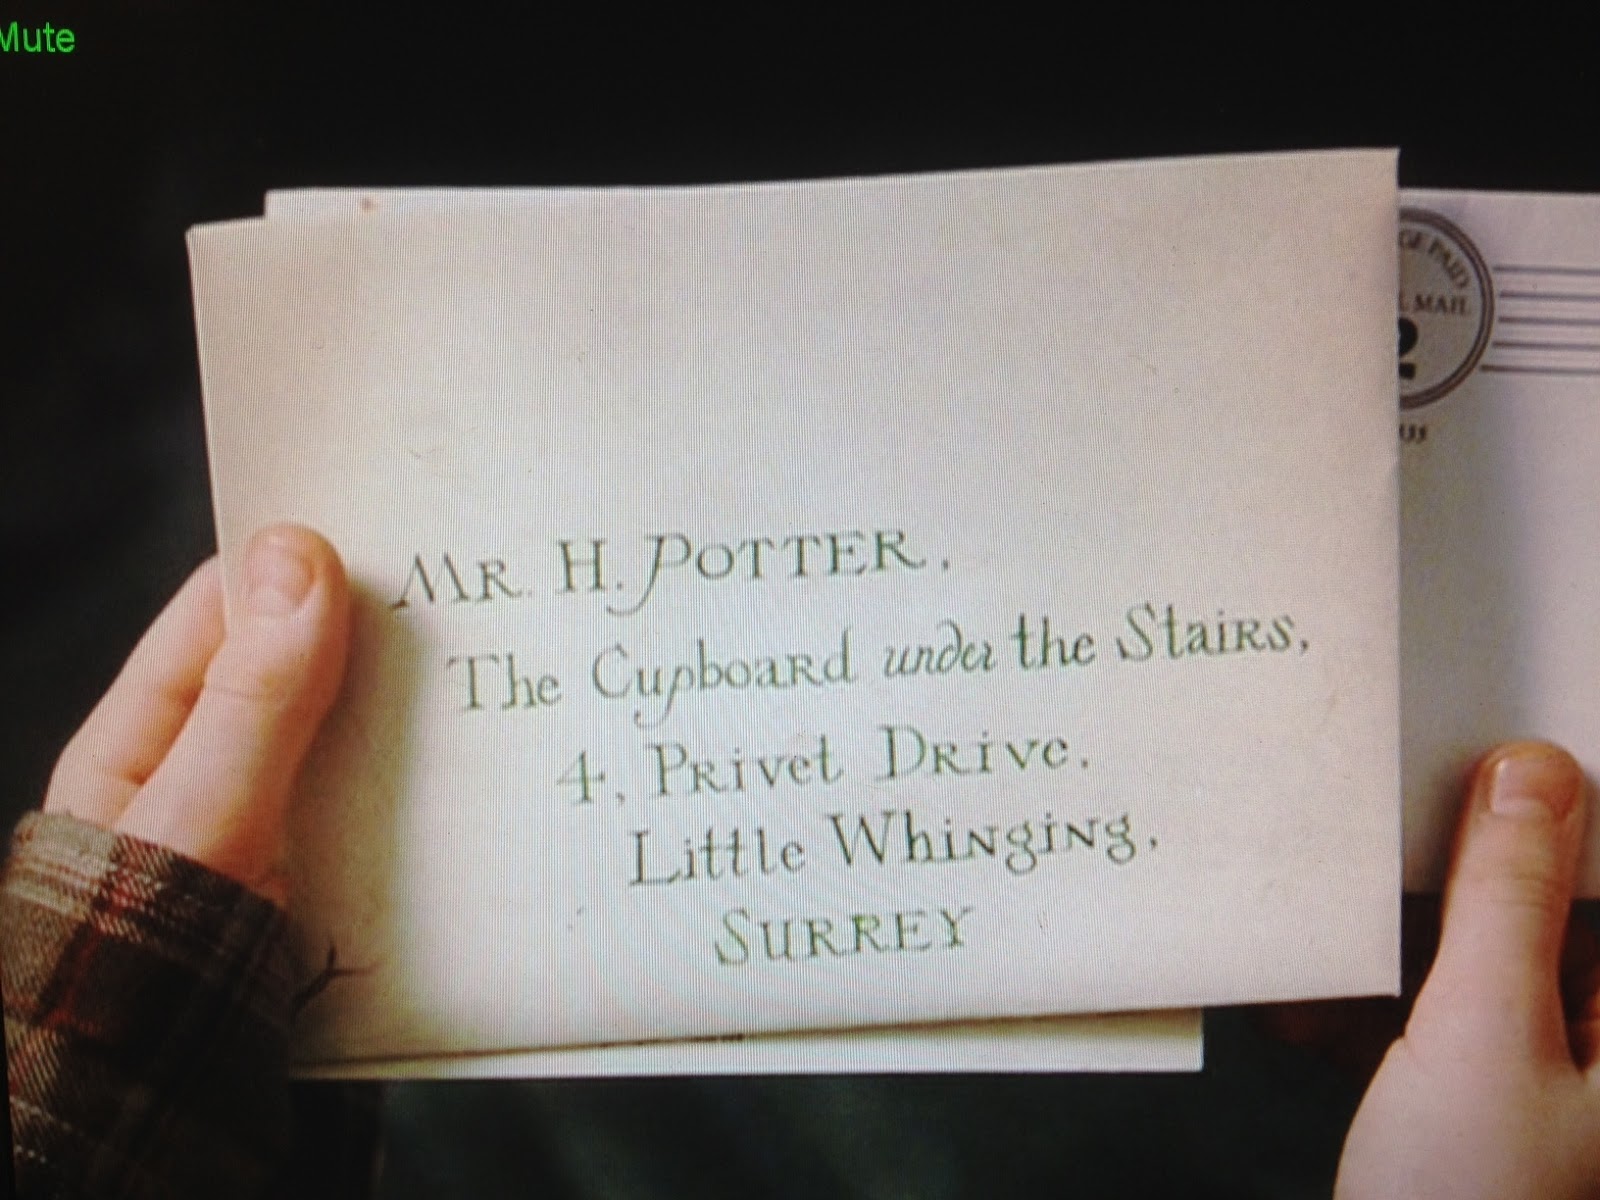
I realized that the movie's acceptance letter (which is what I was trying to use for visual inspiration for font, etc) actually is not the same as the book's.  Like at all!  I had to put the movie on to see for myself ...


It looks a bit like Dumbledore's handwriting from the book and there are all sorts of extra words and stuff in there.  Being a hardcore book fan, I had to stick with the text from the book.  For the record, there is no reason to type all of it out.  Lots of places online have that text already there for you.  Yes, I typed it all out before I realized this.

But I do like the movie's envelope interpretation and that is how I have pictured it in my head all these years, so I wanted to mimic that.


After I typed it all I played with the fonts.  No one online told me what fonts they used, and I will give you a run down because it drove me bonkers trying to find the right ones.  They are not perfect, but I was happy enough with the result.  Fonts I used included:

Baskersville Old Face
Rage
Aqualine Two
Blackladder ITC
Californian FB
Old English Text MT
Algerian
Pea Thinksilver
Footlight MT Light

I used combos of small caps and italics to mix it up a bit too.  If you have specific questions feel free to ask.  All of the fonts were either on my computer already or downloaded for free, so google if you don't have one but want it.  You can snatch Dumbledore's handwriting font (Aqualine Two) here for free, and ermigawd I think I will be using that like everywhere now.

To sign the letter I saved a picture of Minerva McGonagall's signature found on the internet and inserted it into my Word document.  I made it really really light, then went over it in green fine point Sharpie.


End result, I can forge Professor McGonagall's siggy pretty well that way!


This is the header for the letter that I created:


And this is the footer that is on both the letter and the supply list.


Here is a slightly crummy picture of Meatball reading it once he got it.  I cut the paper to about 5.5 inches so it would fit in the envelope I made.


Because the use of scavenger hunts is a bit of a family tradition here, I included a letter from Dumbledore that explained the rules to the hunt.  I will include that in another post since this is quite long as is.

I wanted to make my own envelope because I think sticking in a standard one would have been a crime.  I used the one found here on HP101 Book Collecting as a template.  I also followed his suggestions on the You Tube video to make my folds nice and my glue not be everywhere.


Folding with a table's edge


Keep a piece of paper under the section to keep from sealing your envelope entirely.

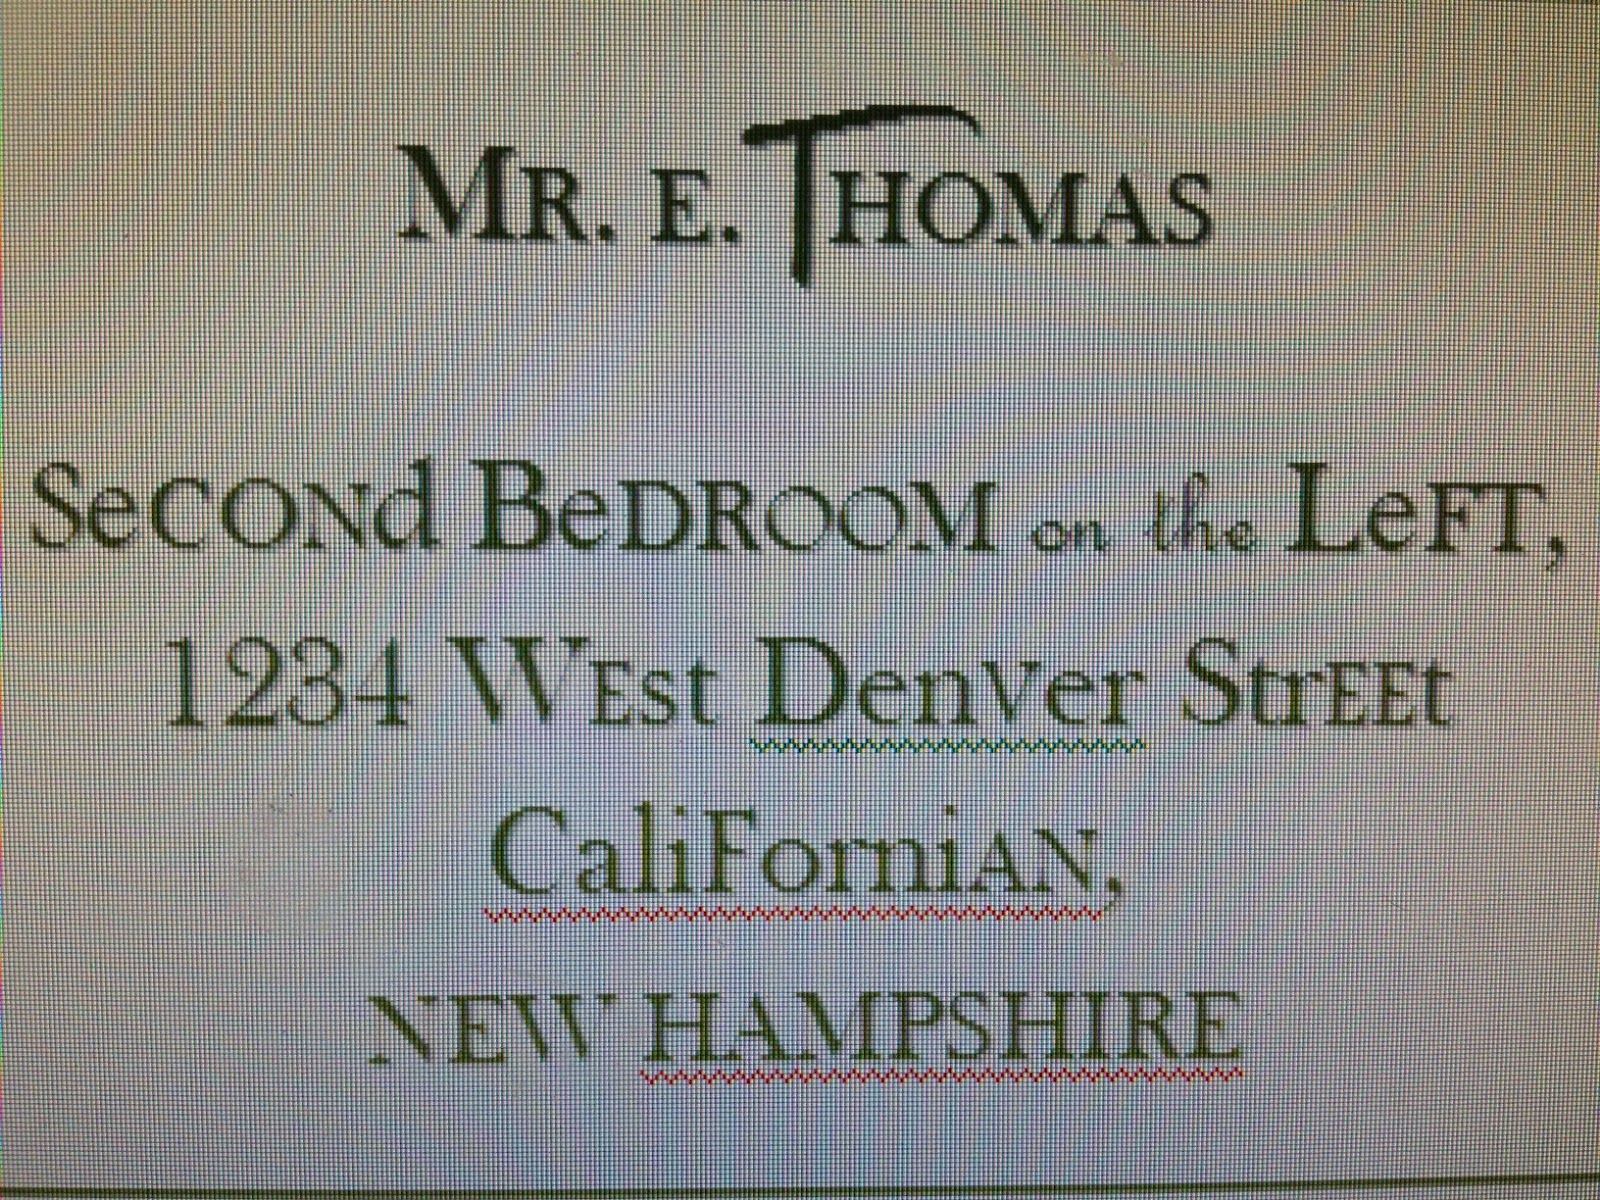
To address it I wound up typing it up in word and surrounding it with one of the call outs that looks like a scroll.  I did this because I could not get my text on the envelope paper straight.  Once I printed it I added some shading by hand to make it look a little less computery.


When I tried to cover up the info that would tell you my child's name or where we lived I wound up only having one line left visible.  So, I made a mock one without the special shading, to show you how I piecemeal-ed the fonts together.  I just took a picture on my computer screen, so its not too pretty, but you get the idea ...


At Hello Paper Moon I found an awesome school crest I used at the top of my letter and an absolutely brilliant idea to close the envelope up.  The idea of me getting anything to its melting point seems highly foolish, so when I saw that I could make something that looked a bit like a wax seal but was not requiring me pouring hot wax anywhere, I was all over it.  She used an image of the seal, printed it on an address label and cut it out.  (Side Note: I totally say the phrase "cut it out" with Dave Coulier's voice)


Bam, sealed envelope with minimal danger and a whole lot of ease!


By the time I was done typing, font selecting, cutting, folding, and gluing I was feeling psyched but pretty worn out.  Its a lot of work, all things considered.  But I needed to have a cool delivery ... cue the evil owls from the Hogwarts cake post.

If you recall, when you went to Bakingdom's site she had this gorgeous set up with the cake and there were these paper owls.  The links are on her site too, and I thought "hey, that will be perfect!  I can print a Hedwig for him!"

What I did not take into consideration is that I apparently suck rocks at folding things into cutesy animal shapes.  If I could have nailed that bastard together, I would have.  Ultimately, it took nearly as long as the freakin' letter did, but the end result was cute.


I used fishing line and hemp to tie it all together and hang it from the ceiling.  I discovered that the reason people drink when they fish is because fishing line is an absolute pain in the ass to work with and I wanted a beer when I was done with it too.


The picture doesn't do it justice, it was cute and worth swearing at paper owls all afternoon.

End result, Hedwig delivered the letter, and Meatball was over the moon.  So much so that he excitedly told me he can't wait for next year's letter/Year Two Supply List and scavenger hunt.

Wait, what?!

*Original post edited per the request of the owner of linked images and artwork.  Sorry if things seem disjointed as a result*

Thursday, September 13, 2012

The Hogwarts Cake Don't-torial

Okay so I totally sucked at posting lately.

I would like to blame two things for this, my in-laws and Harry Potter.

While they are all very nice people, they totally vacuumed all the posting/down time out of my last week ... two weeks ... six weeks ... what day is it again?

Anyway, the cake.  Or as I like to call it the !@#$%^&* cake.

When last we left off I gave you a little tease of the potential failures that loomed in my future.

Oh and the potential was ever so great.  But this, my friends, is a tutorial, of sorts.  Think of it as an If You Are Ever This Crazy & Want To Try This Here Is What NOT To Do Tutorial.  But that title was a mouthful and too long for the blog title, so I went with Don't-torial.

But before we begin, allow me to hang my head and remind you what this was supposed to look like, though I never was quite so delusional to believe I could achieve this level of masterpiece, perfection.


There was no way that was happening, but I had hoped ...

Anyway, since the blog I swiped this idea from is called Bakingdom, clearly she knows what she is doing.  Clearly she is not a cake-mix-from-a-box-kinda-gal.  However, I am.  So, I bought me four boxes of Dunkin Heinz Classic Yellow.  That was my first mistake, because as we all learned in like kindergarten if you start with yellow in color you will have a hard time making things such as blue or red.  But Yellow Cake is the Meatball's fave, and this was supposed to be for him, so I went with yellow.  I also only needed two boxes, I have a separate post (with a lot less fail in it) about those other boxes that were purchased JIC.

Make your mix according to the package directions.  Since this is really bloomin' easy I was feeling pretty good still.  Then I needed to divide my batter into four separate-yet-equal amounts.  Allow me to save you time and messy dishes: one box of Dunkin Heinz cake mix makes 4 cups of batter.


So if you pour those four cups into two separate two-cups, you have two cakes from one mix.  Still feeling pretty good, but having a lot more dishes piling up in my sink, I busted out the food coloring.

I needed a red cake, a blue cake, a yellow cake and a green cake.  This meant that 50% of my cakes were freaking easy peasy.  Yellow was already done for me, and green was a shoe-in with a couple drops of green.  The blue and red had me worried, with good reason.  I read in the comments over at Bakingdom that she used gel colors, and when I did a google search trying to figure out how to make black frosting (we are getting to that) I discovered that these are apparently much more effective at imparting color with less than the liquid drops ... which is a great way to avoid the food coloring taste I was so nervous about.  But alas, having only my cheapo food coloring droppers I forged ahead.

My red cake wasn't bad, but blue was a bit on the teal side.  Bummer, but I was not to be deterred. I had four cake batters, and I started baking.


No, we haven't gotten to the hard part yet.

Frosting.  I needed bronze, silver, gold, and black.  You might think that I would have thought about this, and all the implied complexity it holds, before now.  But if you thought that, you'd be wrong.  Oh no, I charged on into this project without asking the fundamentally simple question "how in the great googly moogly will I ever make those colors out of frosting?!"

So with my cakes baking and my kitchen already looking like a disaster area I then asked this question.  I had both white and chocolate frosting.  I figured the Gryffindor "gold" which isn't a metallic gold really, but more of a bright deep yellow, I could handle.  So I started there.


Yeah, now with the easy one out of the way, I took white frosting and added a single scoop (like a heaping teaspoon) of chocolate frosting and mixed it up.  Bam, I made bronze!  Ravenclaw done!


But silver ... or black?  So in desperation I turned to google.  Now let me make this simple for you.  If ever you need black cake frosting, just go buy the damn black food coloring they apparently sell at hobby stores.  Its worth it.  Because starting with regular chocolate and adding eighty drops of blue and green and red, per the five different sites I found via google, desperately trying to make my frosting look right was a hot mess.  Those sites really are just liars.  Its not black, its just a dark muddy brown.    Once I gave up and accepted that dark brown was as good as it was gonna get without making it taste like plastic, I just mixed a heaping teaspoon into a white frosting and called that "silver."  Here, note the subtle differences between bronze and "silver."


Not much, right?  So, feeling a little less certain, I still march on.  My cakes were done and cool, but not cool enough.  But we will get to that part momentarily.  So I cut them.  I don't know how on in the sam hill the baking goddess (as I was now mentally referring to her, no mortal can do this crap) made two cuts in six inch cakes.  Here I was with nine inch cakes and I could only do one without them falling a-freaking-part on me.  Only having one of those little rings has a whole lot less impact in the final reveal, let me tell you.


So I cut the cakes, removed some of the excess (too much in some places, the beast was about 50/50 icing to cake ratio when I was done) and decided it was time to frost-fill.

Oh how wrong I was.

Trust me, if you do not wait long enough and you have cake that is even slightly warm or frosting that is even slightly room temperatureish you will get this.


My advice?  Freeze the effing cake pieces.  Refrigerate the frosting and pull it out about five minutes before you are ready to go.  Then, well, make one hellova mess.

My color order was messed up, I had frosting everywhere, and I am certain I heard the Beans mimic me and say "oh shit" while playing with his toys.


The end result.  Note the not-quite-black frostin on that top Hufflepuff layer?  Or the teal bluey green of the Ravenclaw layer just under it?  Not quiiiite the same as the original, as you can see here:


But I was hopeful that frosting could cover up the mess and make it still look fantastic.  Hope springs eternal, right?


Not completely wrong I suppose, it did look better, but I had no idea how on earth it would look once we cut into it.

The wax paper you see in there was placed so that I could ice this biotch without worrying about getting it on the plate.  Once I was done I pulled the wax paper strips off and it looked clean.  I have no idea why it is in the refrigerator at this stage.  I don't remember doing that ... oh well.

Then I made the decorations.  Those were simple, if not a bit tedious.  Bakingdom offers them on her site too, along with those cute owls you see in the picture with the completed cake.  Don't let them fool you, the owls are evil, more evil than the cake, but that is another post.  Soon.  I promise.

Anyway, the decorations:


My supplies: Printed (on cardstock) images, a folder thingy, scissors, bamboo skewers (not pictured), and hemp (also not pictured)


This is how I glued the banner with the song words on to the bamboo skewers.  It worked beautifully, and was the one thing I did on my own and did right.  Thus, I had to include it. Yay me!

Once those were done and it was time, I assembled it all, we lit the candles, sang ... and Meatball loved it.  But that was when he thought it was just a tall chocolate cake with spiffy decor.


Then we cut into it.


Sorry, the picture is blurry because, well, I was laughing too hard. It was either laugh or cry, so I went with laugh.  Turning to look at Meatball to see what he thinks -- because all the adults in the room where being overly kind and generous with their "ooo"s and "ahh"s -- I found him amazed and excited.  He immediately got the colors and understood the cake, he thought it was "totally wicked" which I presume means "good," and was quite thrilled.  I will not be showing him any of the concept/inspiration pictures, of course.


So while I thought it was atrocious, he liked it.  Which I guess is should be all that matters.  It did not taste like food coloring, which amazed the crap out of me.  It did have about a 50/50 icing to cake ratio and was a tad rich, so everyone took small pieces.

Feeling foolishly reassured, I felt inspired to do another Harry Potter related gift for Meatball.  This is, after all, his eleventh birthday ... and you know what happened to Harry on his eleventh birthday ...

If you don't know, *gasp!* go get your geek on and read the darn books! Then come back and read tomorrow's post! Here is a hint ...

Saturday, September 1, 2012

ewmigawd!!!!

Okay I posted the Hogwarts Cake teaser, but I just had to say I am so doing the happy dance and freaking out because I have 17 followers!

Seventeen!!!

So excited because you are HERE!

So confused, why you would want to be ...

But so thrilled anyway!

So, welcome!  Feel free to read, comment, and ask anything.  Well not anything ... I mean if you have like creepy questions go ahead and keep 'em to yourself.  Oh and I will follow you back, so you are stuck with me now.  Ha ha! Sorry about that. ;)

Hogwarts Cake, Part I

I knew it was a bad idea, yet I had hope.  Why I don't know, but I did have some hope.  Hope that because this was for my baby, my Meatball, I could some how dredge up the ability to not totally screw up the most perfect cake ever for him.

Jury is still out, because it has to be iced and also has to be cut into ... that is the scary part, I won't know if I pulled it off until we cut into it.  In front of my child, parents, siblings, and in-laws.

Go ahead, say it with me ... WTF was I thinking?!?!

At any rate, I will post a bigger tutorial with this when all done, not because I feel like I know how to but I certainly know how NOT to do some of it.  But it would be remiss of me to not give you a "taste" wouldn't it.

So here you go, a little teaser.


A quick example of what not to do.
Ever.


My cake.  I changed the color order for a reason ... namely I screwed something up in assembly and this was the best way to cover that mistake up. I will explain all of this in the full post and reveal.


The real cake.  The original.  Yeah.  I know, I know.  


This is what it looks like presently.  I was told that I should plastic wrap the crap out of it and freeze the layers so that the "moisture gets locked in" so I did.  Not so sure it that will help me or hurt me though.

I am hoping and praying fervently that once iced the majority of the ugly bits are hidden.  I am also praying that it tastes okay and isn't too dry or too food coloring tasting.  I tasted as I went and it was fine individually, but with my cheap food coloring I had to add a lot in order to make it get close to the right colors.  

**To see the completed cake in all is atrocious glory, head on over to this post.**